#blender realtime
Explore tagged Tumblr posts
Visit Tumblr Blog
Explore Tumblr blogs with no restrictions, modern design and the best experience.
Last Seen Tumblr Blogs


Fun Fact
Tumblr has been providing a Korean-language service since 2013.
Text

An older artstation challenge I did for the King Arthur 3D prop project. This was the 3D sword asset I chose from the amazing concept from Decios junior.

I also got the sheath to work! :'''D
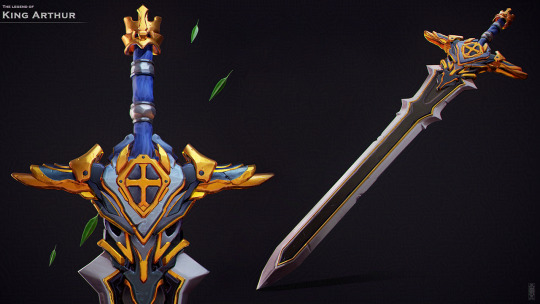
Keyshot renders.

Wireframe.
#digital art#digitalart#digitalartwork#made by human#no ai art#noai#stylized#3d artwork#3d art#3d model#3d modeling#3d#blender#lowpoly#art#3d render#realtime#blender3d#blender 3d#low poly#3d assets#game art#game assets#king arthur#sword
3 notes
·
View notes
Text
Ooh if I could figure out a way to link realtime performance input to like the rate that an animated loop cycles there's some potentially interesting animation shortcut to do shit with
#i was able to drive simple lipsync in realtime in after effects with null objects at one point before getting locked out of that ecosystem#i assume blender has somewhere in the depths of its features some means of inputting keyframes in realtime#if i get that much i think i can work out the rest from there#blender has a robust enough rigging system that i assume incorporating controllers for 2D rigs would be straightforward#hell blender is feature dense enough that if i just couldn't figure out how to drive a rig in realtime#that i know i could just puppeteer paper tracking markers in front of my damn phone camera and drive a rig with that
0 notes
Text

Studio So-Alt
0 notes
Text

#digital art#digital arwork#unity3d#blender#colorful#virtual photography#art#indie games#indie music#realtime
1 note
·
View note
Text
I found out that Bartosz Ciechanowski did an article on airfoils about a year ago. This was one of the topics I tried to explain when I worked at brilliant.org years ago - in a classic hyperfocus moment I pulled down Doug McLean's book Understanding Aerodynamics - Arguing from the Real Physics and taught myself how to use computational fluid dynamics software, and animated a fan in blender and shit, but in the end I found what I wrote for the site very unsatisfying since I didn't have the space to explain it properly. (It didn't land particularly well with the users and the higher ups were not happy with how much time I spent on it, but personally I found it a really fun project...)
Safe to say that what Bartosz is doing here blows my effort out of the water. Dude's written an entire realtime CFD sim that runs in the browser so you can watch the flow field converge, and has the best step by step exposition of the reciprocal relation of pressure and velocity I think I've read. Bartosz always does stuff on this level, his is literally the best physics explaining site I've ever seen and it's not even close, but this is a topic that I've actually tried to get across so I have a particularly acute sense of how bloody difficult it is to write an accessible clear account like the one here.
If you've ever wondered how airfoils work and found a lot of the commonly repeated incorrect explanations like 'equal travel time' unsatisfying, or just want to understand fluid dynamics more in general for that matter, seriously read this (and then pick up McLean's book to get into the details further lol).
114 notes
·
View notes
Text

The animatic is finished and has been shipped off, and work has already begun on background planning and music! I've also finished skim-watching the rigging course, and I'm ready to go.
First off, there's work on Rose, and that's going to be...a lot. New cephalothorax mesh, new method for hair, a completely new approach for her eyes, an entirely different rig altogether...the to-do list for Rose has been steadily building, and it's finally time to confront it.
All in all, the work on Rose alone will probably take a week or more, though I've already made a lot of small fixes (for instance, she's now slightly bigger, as she should have been all along--but that's a lore fix, not a tech fix). The hair stuff I'll try to get done over the weekend--right now, I'm just testing lots of possible approaches.
Blender giveth, and Blender taketh away. Blender has destroyed one of my main rigging methods...however, it has also finally caught up to my vision, and I can now do 90s Disney-style soft shading in realtime!
After that, Sophodra also has a lot that needs fixing, though not nearly as much. Lots of fixes for the hivers, a whole lot of fixes for Vera (not nearly as many as Rose, but the fixes do involve rigging, weight painting, and texturing...). And that's not counting all the bug models. At least I'm getting help with assets! It's probably going to take more than a month before I can start on staging, though. Still, holding out for an April release. Until next time!
63 notes
·
View notes
Text
YOU CAN USE VR FOR REALTIME BLENDER MOCAP
MY PARTICLES ARE DROPPING IT TO 6 FPS BUT OTHERWISE SHITS GOOD
#SORRY FOR NOT BEING AROUND IN A WHILE IVE NEVER BEEN MORE PRODUCTIVE IN MY LIFE DESPITE MUCH BULLSHIT#this isnt even put together super well I gotta align the headset a tad better#HLVRAI#B3D#aight back in my hiatus hole#finished blasphemy painting soon if i dont get consumed by another project#said project has had me learning basic shit about plasma physics and atmospheric gas#i barely understand
23 notes
·
View notes
Text
Trying out realtime multi-pass compositing in Blender 4.3, and this is a huge step forward for stylization! I have more control of the final look, and I get to see the changes without having to wait until the sun burns out for the image to render!
See this post for more context for the toon shading. I'll probably upload the node tree later.
#sadie.txt#my art#art#artists on tumblr#blender#3d#toon shading#yume nikki#madotsuki#is still happy to be here
21 notes
·
View notes
Text
TF2 Blender Guide: Adding the Kritz Effect to Weapons
This is a guide on how to add hisanimations' Blender recreation of the Kritz effect to weapons. Guide by Katy133.

(Above image by hisanimations.)
The Shader Material
Select the mesh (not armature) of the weapon. (Image: Labeled 1 in screenshot)
In the Material Properties tab, select the weapon's material from the material slots (if there's a slot with gold in the name, it's the weapon's Australium material, which you can ignore if you aren't using that one. Ditto the RED/BLU team variant you aren't using). (Image: 2)
Go to the Shading workspace tab at the top. In the Shader Editor window, select the New Material button, located to the right of the name of the selected material. You've now created a copy of the weapon's material (its name ending with the .001 prefix). Rename this new material something clear, like c_scattergun_kritz (adding the _krtiz prefix to the name). (Image: 3)
Add > Color > Mix Color. Change the node's blend mode from Mix to Overlay and the node's Factor to a value of 1.0. For the B colour, select it and change the Hex to #FF423E (red). Then plug the $basetexture node's Color to the Overlay node's A. Plug the Result to the VertexLitGeneric node's $basetexture [texture]. (Image: 4)
For the VertexLitGeneric node, change the values of the following node properties:
$selfillum [bool]: 1.0
$selfillummask [texture alpha]: 0.230
Selfillum strength: 48.740
The weapon should now appear bright red, with the textures of the weapon appearing underneath. Depending on the weapon you are altering, you may want to play around with these values. (Image: 5)
To keep the data of the original weapon material shader, go to the Material Properties tab, press the Add Material Slot (the + button), and then add the name of the original (unedited) copy of the weapon material to the slot. (Image: 2)

The Lightning Geo Node
Go to the Modifiers property tab. Select Add Modifier > Geometry Nodes. There should now be a Geo Node modifier to the mesh. (Image: 1)
At the top of the screen, select Edit > Append… In the new window, find the .blend file for hisanimations' Kritz Effect. Select it > Node Tree > Kritz Effect > Append.
Back in the Modifiers property tab, select Kritz Effect from the dropdown menu of the Geo Node modifier. You will now see a bunch of new properties. (Image: 2)
For Spark Color, change the Hex to #FF4144 (red). Change Emission to 5. Change Max Jitter to 900. The lightning should now appear on the weapon when you play the Timeline. The lightning will face the active camera. (Image: 3)
Turning it Off/On For Animations

Sometimes, for an animation, you want a shot where a weapon becomes Krtiz-ed or a shot where the Kritz effect wears off. For that, you can keyframe the necessary values on/off, which I will list below for both the material shader and the lightning geo nodes.
To add keyframes to a value, you can either hover over it and press the add keyframe hotkey, or right-click on the value and select Insert Keyframe. Yellow means there is a keyframe on the frame you are currently on in the Timeline. Green means that there is a keyframe somewhere else on the timeline.
For the shader material: Keyframe the Overlay node's Factor's value from 1.0 to 0.0 (1 being 100% on, and 0 being fully off).
For the lightning: Keyframe on/off the Realtime and Render visibility buttons in the Geo Node modifier (via the Modifiers property tab).

4 notes
·
View notes
Text
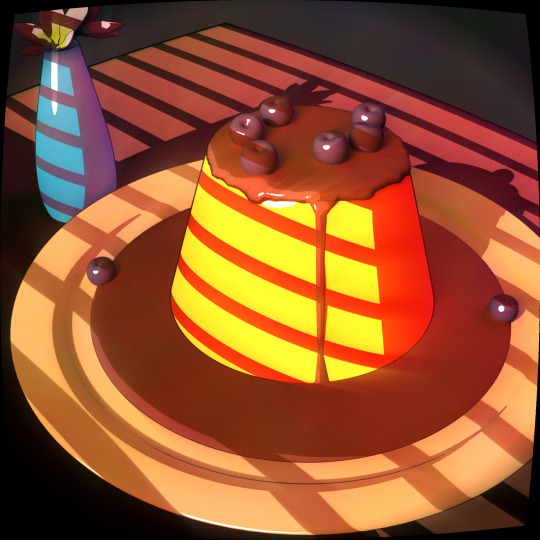
My roughness pack in EEVEE (Realtime) - Blender
3 notes
·
View notes
Note
Crazy question. I’ve been an artist for years, but animation always escapes me. Any advice for an artist who does work professionally but is interested in animating for personal projects/fun? Any programs or tutorials in particular?
crazy answer:
I'm not a great visual artist at all (I can sketch and paint a little, but i'm a novice when it comes to anything specific to details or proportions or a consistent style)
because of that a lot of my early animation experience was either stick figures in DSi FlipNote, and then "puppet" engines (think Pivot2D, Source Filmmaker, Blender3D) where the visuals are somewhat handled for me and I can just focus on a subject's motion. wait also i did stop motion lego animation for a bit, which is just puppet engines but more tedious since it's strictly frame by frame
as an artist who can draw if u wanna do straight 2D you can probably just "find" a copy of Adobe Animate or set up similar free software like OpenToonz (I've used both and they both seem good) and follow basic youtube tutorials on navigating a timeline and setting up onion skins and layers etc
if you wanna go 3D though this was my favorite tutorial growing up - the UI is outdated for modern Blender but the principles are all good. (note that learning how to navigate 3D toolset before animating is kind of a frontloaded thing to work on... kinda like learning how to draw was a frontloaded thing i was too stubborn to do for 2D animation when i got into it)
I haven't given enough of a try into 2D yet to really recommend one over the other. Regardless though just starting with the basics is similar across both disciplines
if you have patience and can find fun in the process of doing Ball Bouncing and Walk Cycles (I always get excited when I playback in realtime, no matter how simple or complicated an animation is) the same way that you successfully drilled through learning Shapes, Perspective, and Lighting, then you'll be doing epic shit soon 😎
last tip if you are perfectionist: starting silly first is good training wheels since there's more leeway with goofy motion or action. then u can get into nuanced character acting once you have a better general sense of weight and timing
3 notes
·
View notes
Text
Aha! I knew you could link blendshapes to camera position
#it turns out i do have access to what i need to make a character rig that automatically cheats its geometry to look good from whatever angle#but i would so much rather just draw the damn stylized character i think i could do that much faster frankly#might be able to find some unintuitive use for this though#maybe if im driving the performance in realtime it would make it more worth it#I'm pretty sure blender lets you use greasepencil to animate 2d elements locked to the camera you could probably use that similarly
1 note
·
View note
Text
How to install malt/BEER
NPR render engine for Blender
What is malt and BEER?
From the official website:
Malt is a fully customizable real-time rendering framework for animation and illustration. It's aimed at artists who want more control over their workflow and/or their art style, with special care put into the needs of stylized non-photorealistic rendering. Designed as a community effort to expand the possibility space of 3d rendering, it provides graphics programmers and technical artist an enjoyable “shadertoy-like” workflow inside Blender, while still allowing to effortlessly share their work with non technical artists through Python and GLSL plugin Official website mal3d.com
Blender Extended Expressive Renderer (BEER) is a free and open source realtime non-photoreal (NPR) rendering engine. The main feature of BEER is the ability to extend the rendering capability from the ease of adding custom shaders to a customizable shader graph. Since NPR is a journey of endless styles which never settle, we need a render engine which will fulfill all the stylized needs. Light BWK, co-founder of BlenderNPR.org
It's a free and Open source real time render engine made with full focus on Non Photorealistic Rendering or Stylized rendering. It distinguish itself from other engine by being extremely customizable for the most skilled among us
Showcase:
Made by @/Renato3xl
Made by myself @axiasart
The only inconvenience with this render engine is the terrible terrible (needed to be said twice) lack of up to date tutorials. This shouldn't confuse people in thinking that this project is dying or unpopular. The latest release was on July 20th.
How to download and install malt/beer?
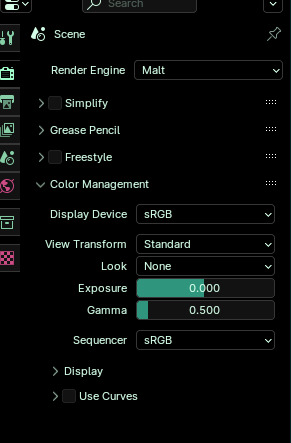
Downloading malt is pretty straightforward, on the github release page: https://github.com/bnpr/Malt/releases/tag/Release-latest

blender preference, enabled Malt render
Downloading and installing BEER is more complicated, first of course downloading it from github: https://github.com/bnpr/BEER
From the zip you will only need the BlenderBeer folder so you should extract is and put it anywhere.
You will also need to download Pygments which is found here: https://github.com/pygments/pygments/tree/master
You won't need the whole thing, once you download the zip, extract the pygments folder only.
Now that we have all the ingredients we can start cooking.
First you will need a script folder, put it where you keep your blender files. Then in this script folder add two folders modules and addons.
Next, you move the pygments folder in the modules folder and the BlenderBeer folder in the addons folder.

#artists on tumblr#tutorial#blender#3d#3d artwork#render engine#malt render engine#npr#bnpr#3d texturing#digital art#3d art#art study
4 notes
·
View notes
Text

Deira Neo toxiposm kitbash (personal avi, credits after cut)

Deira Neo toxiposm credits
key:
*texture edit by mx. kit chimera (substance painter) ~mesh/armature edits by mx. kit chimera (blender)
Deira Neo*~ - https://marivr.gumroad.com/l/DeiraNeo
HYPO - Dreamland Ears & Tail*~ - https://houseofheretics.gumroad.com/l/vmfec
Rodent ears*~ - https://aantara.sellfy.store/p/rodent-ears/
Jace hair*~ - https://zinpia.sellfy.store/p/male-hair-pack-01/
''Hair Texture Pack'' Free - https://cicieaaavr.gumroad.com/l/cicihairtex
Chain Crop Top* - https://vinuzhka.gumroad.com/l/yvgso
Ripped Jean Shorts for VRChat - https://saikura.gumroad.com/l/Jorts
Sequins Slip Dress* - https://goodsoup.gumroad.com/l/slipdress
"Play to Win" Sweater (Renipuff) - https://payhip.com/b/NspH2
Realtime OSC Watch, the "No Watch" for VRChat 3.0 avatars VRCFury - https://fuuujin.gumroad.com/l/NoWatch
Quest Comptible Flow Toy ☁ Cloud Portals ☁ - https://gmsbox.gumroad.com/l/cloudportals
Low(er) poly Pip-boy 2000 Mk VI - mx. kit chimera sock arm sleeve - mx. kit chimera Half moon glasses - mx. kit chimera (matcap overlay from poiyomi server) Glowing mushrooms - mx. kit chimera, matcap overlay by Entorix (poiyomi server) underwear/swim bottom - mx. kit chimera Toothpick (with viseme blendshapes) - mx. kit chimera Plane eyelashes - mx kit chimera Star earring - mx kit chimera
3 notes
·
View notes
Text
「viRtua canm0m」 Project :: 002 - driving a vtuber
That about wraps up my series on the technical details on uploading my brain. Get a good clean scan and you won't need to do much work. As for the rest, well, you know, everyone's been talking about uploads since the MMAcevedo experiment, but honestly so much is still a black box right now it's hard to say anything definitive. Nobody wants to hear more upload qualia discourse, do they?
On the other hand, vtubing is a lot easier to get to grips with! And more importantly, actually real. So let's talk details!
Vtubing is, at the most abstract level, a kind of puppetry using video tracking software and livestreaming. Alternatively, you could compare it to realtime mocap animation. Someone at Polygon did a surprisingly decent overview of the scene if you're unfamiliar.
Generally speaking: you need a model, and you need tracking of some sort, and a program that takes the tracking data and applies it to a skeleton to render a skinned mesh in real time.
Remarkably, there are a lot of quite high-quality vtubing tools available as open source. And I'm lucky enough to know a vtuber who is very generous in pointing me in the right direction (shoutout to Yuri Heart, she's about to embark on something very special for her end of year streams so I highly encourage you to tune in tonight!).
For anime-style vtubing, there are two main types, termed '2D' and 3D'. 2D vtubing involves taking a static illustration and cutting it up to pieces which can be animated through warping and replacement - the results can look pretty '3D', but they're not using 3D graphics techniques, it's closer to the kind of cutout animation used in gacha games. The main tool used is Live2D, which is proprietary with a limited free version. Other alternatives with free/paid models include PrPrLive and VTube studio. FaceRig (no longer available) and Animaze (proprietary) also support Live2D models. I have a very cute 2D vtuber avatar created by @xrafstar for use in PrPrLive, and I definitely want to include some aspects of her design in the new 3D character I'm working on.

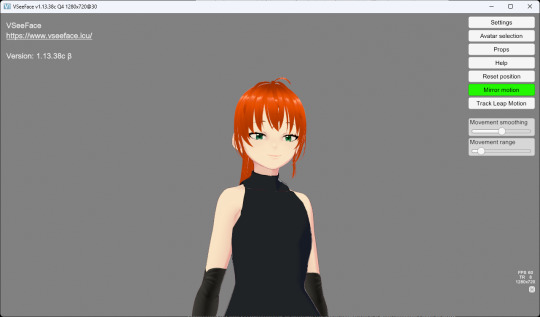
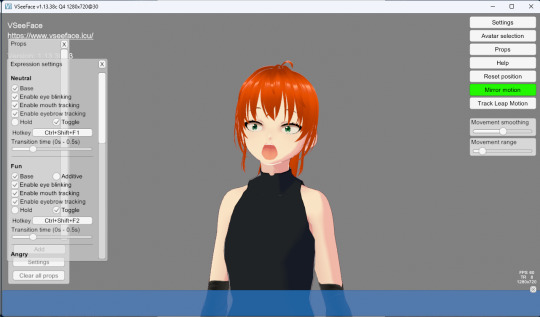
For 3D anime-style vtubing, the most commonly used software is probably VSeeFace, which is built on Unity and renders the VRM format. VRM is an open standard that extends the GLTF file format for 3D models, adding support for a cel shading material and defining a specific skeleton format.
It's incredibly easy to get a pretty decent looking VRM model using the software VRoid Studio, essentially a videogame character creator whose anime-styled models can be customised using lots of sliders, hair pieces, etc., which appears to be owned by Pixiv. The program includes basic texture-painting tools, and the facility to load in new models, but ultimately the way to go for a more custom model is to use the VRM import/export plugin in Blender.
But first, let's have a look at the software which will display our model.
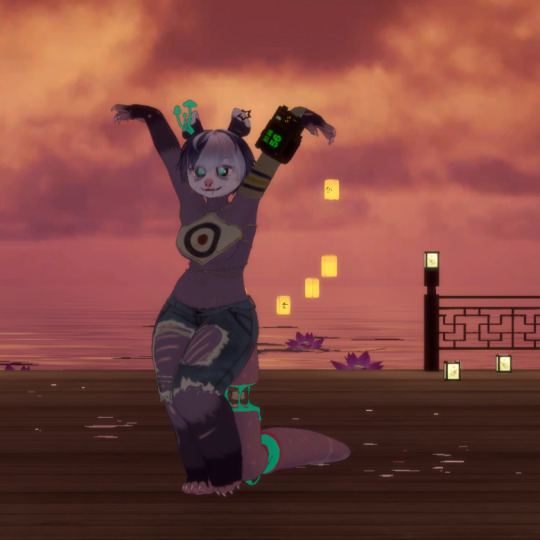
meet viRtua canm0m v0.0.5, a very basic design. her clothes don't match very well at all.
VSeeFace offers a decent set of parameters and honestly got quite nice tracking out of the box. You can also receive face tracking data from the ARKit protocol from a connected iPhone, get hand tracking data from a Leap Motion, or disable its internal tracking and pipe in another application using the VMC protocol.
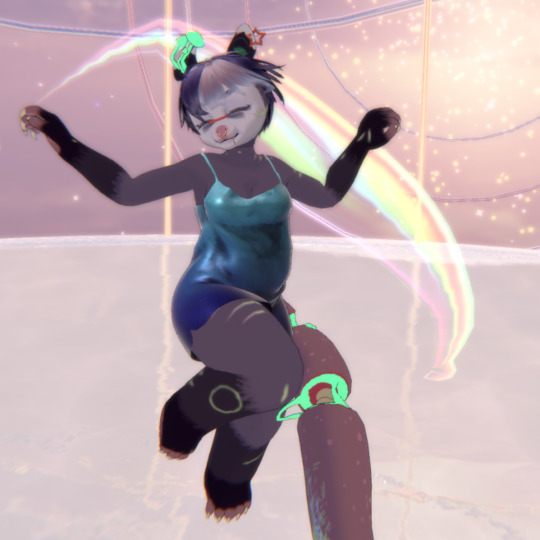
If you want more control, another Unity-based program called VNyan offers more fine-grained adjustment, as well as a kind of node-graph based programming system for doing things like spawning physics objects or modifying the model when triggered by Twitch etc. They've also implemented experimental hand tracking for webcams, although it doesn't work very well so far. This pointing shot took forever to get:
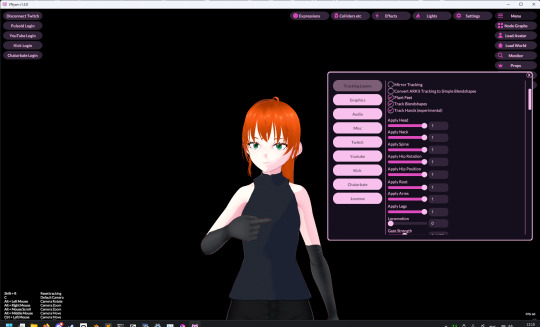
<kayfabe>Obviously I'll be hooking it up to use the output of the simulated brain upload rather than a webcam.</kayfabe>
To get good hand tracking you basically need some kit - most likely a Leap Motion (1 or 2), which costs about £120 new. It's essentially a small pair of IR cameras designed to measure depth, which can be placed on a necklace, on your desk or on your monitor. I assume from there they use some kind of neural network to estimate your hand positions. I got to have a go on one of these recently and the tracking was generally very clean - better than what the Quest 2/3 can do. So I'm planning to get one of those, more on that when I have one.
Essentially, the tracker feeds a bunch of floating point numbers in to the display software at every tick, and the display software is responsible for blending all these different influences and applying it to the skinned mesh. For example, a parameter might be something like eyeLookInLeft. VNyan uses the Apple ARKit parameters internally, and you can see the full list of ARKit blendshapes here.
To apply tracking data, the software needs a model whose rig it can understand. This is defined in the VRM spec, which tells you exactly which bones must be present in the rig and how they should be oriented in a T-pose. The skeleton is generally speaking pretty simple: you have shoulder bones but no roll bones in the arm; individual finger joint bones; 2-3 chest bones; no separate toes; 5 head bones (including neck). Except for the hands, it's on the low end of game rig complexity.
Expressions are handled using GLTF morph targets, also known as blend shapes or (in Blender) shape keys. Each one essentially a set of displacement values for the mesh vertices. The spec defines five default expressions (happy, angry, sad, relaxed, surprised), five vowel mouth shapes for lip sync, blinks, and shapes for pointing the eyes in different directions (if you wanna do it this way rather than with bones). You can also define custom expressions.
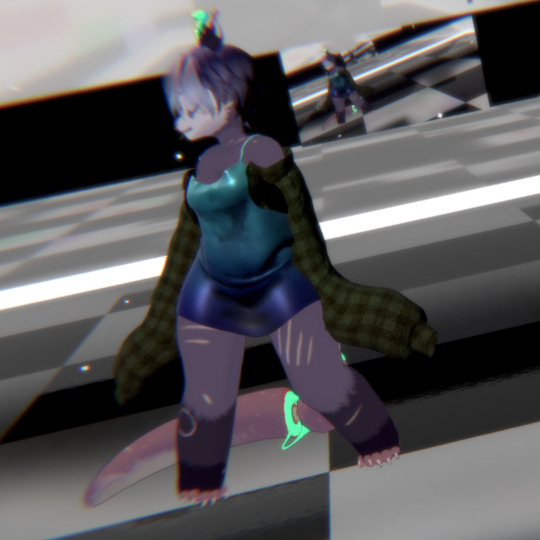
This viRtua canm0m's teeth are clipping through her jaw...
By default, the face-tracking generally tries to estimate whether you qualify as meeting one of these expressions. For example, if I open my mouth wide it triggers the 'surprised' expression where the character opens her mouth super wide and her pupils get tiny.
You can calibrate the expressions that trigger this effect in VSeeFace by pulling funny faces at the computer to demonstrate each expression (it's kinda black-box); in VNyan, you can set it to trigger the expressions based on certain combinations of ARKit inputs.
For more complex expressions in VNyan, you need to sculpt blendshapes for the various ARKit blendshapes. These are not generated by default in VRoid Studio so that will be a bit of work.
You can apply various kinds of post-processing to the tracking data, e.g. adjusting blending weights based on input values or applying moving-average smoothing (though this noticeably increases the lag between your movements and the model), restricting the model's range of movement in various ways, applying IK to plant the feet, and similar.
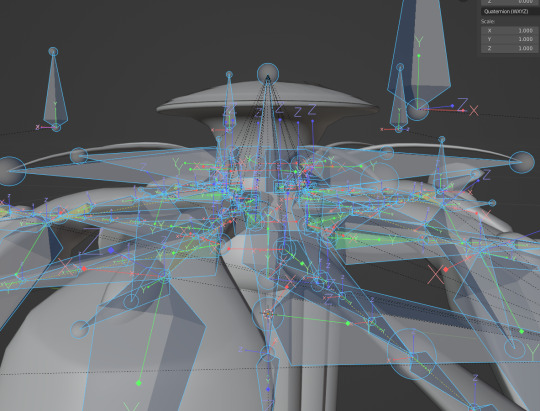
On top of the skeleton bones, you can add any number of 'spring bones' which are given a physics simulation. These are used to, for example, have hair swing naturally when you move, or, yes, make your boobs jiggle. Spring bones give you a natural overshoot and settle, and they're going to be quite important to creating a model that feels alive, I think.
Next up we are gonna crack open the VRoid Studio model in Blender and look into its topology, weight painting, and shaders. GLTF defines standard PBR metallicity-roughness-normals shaders in its spec, but leaves the actual shader up to the application. VRM adds a custom toon shader, which blends between two colour maps based on the Lambertian shading, and this is going to be quite interesting to take apart.
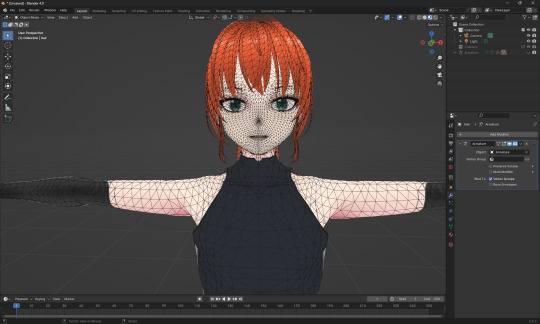
The MToon shader is pretty solid, but ultimately I think I want to create custom shaders for my character. Shaders are something I specialise in at work, and I think it would be a great way to give her more of a unique identity. This will mean going beyond the VRM format, and I'll be looking into using the VNyan SDK to build on top of that.
More soon, watch this space!
9 notes
·
View notes
Text
my experience with blender and unity, together, has been a bit of a nightmare, but separately they haven't been bad. unity i've had issues with but they always felt surmountable, like, no matter what i can work around this problem.
blender i just enjoy, it has this reputation as like a weird badly designed software but maybe that's gone away w/ recent (recent as in.. years ago) ui changes. new features have been great and there isn't much for me to complain about here, but idk what a new user's experience is like. it's hard to tell people who ask me how to get started what to work with, bc everything i learned from is out of date.
the real headache comes from the transition between the two, which has been a real nightmare for me. once i'm all done working on wormgrubber 2.0, i need to put together workflow document to reference whenever i'm working on new 3d assets for unity in the future. it's a big list and it's been a real pain to discover each problem one at a time.
first and foremost it is obvious to me now that blender is not gamedev software. when i started gamedev, i split my time between learning shaders and learning 3d, not touching animation and mostly focusing on making little model display art pieces. i did this for a couple years. rigging was always a huge pain in the ass, weight painting moreso, so i just avoided it for a while. when i brought my first fully rigged piece into unity it was a nightmare, nothing looked right at all. this kind of thing honestly traumatized me, lol. i spent so much time trying to obsessively make perfect rigs bc i was terrified by shapekeys and drivers, horrified to spend hours setting something up only for it to be useless. this was wrongheaded for multiple reasons... there are so many features in blender that are just not relevant to unity and/or don't export through the only 3d format unity uses, fbx. this makes sense if you think about it for a bit, blender has a lot of features for rendering 3d animation and art but a lot of this wouldn't work in a realtime game, it's just too intensive. but! if you spend all your time learning 3D instead of specifically learning "3d for game animation" you come to lean on things like corrective smoothing or other modifiers.
3d is a weird mix of like, destructive and nondestructive workflows. blender will often let you work your way into positions you cant easily recover from without a lot of extra work or discarding work, setups that work fine within blender but absolutely will not export to unity. things like being unable to apply modifiers to models with shapekeys, but needing to apply all shapekeys to properly export a model, etc.
unity does this thing where it has very specific ideas about how things should work and it only tells you what it's doing maybe like 20% of the time. everything else is up to you to figure out the hard way. im not sure yet if this is an fbx problem or not but interpolation settings in blender aren't exported to unity, so it just comes up with its own. unity doesn't play the last frame of an animation. this makes sense for some contexts, because an animation is an interpolation between a start point and an end point, but like, nothing in unity tells you this the case. whenever i search for these things i always find forum posts, not unity documents. and you cant really change it without clumsy code slapped on top bc so much of this is below the closed off part of unity's code.
make games this way, not that way. i used to always think that when i was struggling against unity it was a sign i was designing something poorly, but now i know enough to know it's often because unity is itself struggling under the weight of choices made years ago, or half finished projects with poor documentation. arcane rules and practices i don't know bc i didn't go to college and because the knowledge is typically split across like several different jobs in a normal large studio.
i don't know how you learn this stuff other than trial and error. maybe in a college?? i dont know how other self taught indies deal with it. tutorials on youtube/etc seem to be split between like teaching you isolated tricks or teaching you very specific workflows without telling you exactly why you can't do this or that. blender tutorials are often for non-gamedevs, and unity tutorials are about following unity's design decisions without explaining them.
i know creating tutorials is a lot of effort and it's impossible to be fully comprehensive, but for something as common as 'take blender thing and put it in unity' should be for indie gamedev, i dont get why i havent seen more grumbling about this. i feel like every major snag i've come across (ones mentioned here are only a few of them) i was completely clueless about until i started doing some digging and the only thing to save me is some post from like 2016 on the unity forums.
its been a struggle!!!! i know i'm getting closer to the end of the tunnel but like every time i think it's a straight shot some new pit opens up. still, i'm getting there. my short advice to anyone is to always iterate, if you are trying to make art for games, make some art and put it in gamdev software. see what you like about it, how your desired workflow works with the software, etc. these skills arent separate, they have to be tied together.
4 notes
·
View notes